Installing Ruby with frum
Installing Ruby with frum
Operating System: MacOS
Required skill level: Comfortable using the Command Line, knowledge of folder structures
Required software: Installed and working Homebrew package manager
Contents:
- Why not use the preinstalled Ruby?
- Install frum and openSSL
- Configure your $Path
- Install Ruby via frum
- Verify correct installation
- Personal notes
Why not use the preinstalled Ruby?
It’s not recommended to use the preinstalled Ruby version (also known as the system Ruby) for the following reasons:
- The system Ruby version is outdated and you can’t update it.
- System Ruby is there for software compatibility reasons, not for actual personal use.
- Trying to install gems will fail, since you don’t have writing permissions for the directories.
Some guides suggest to install gems with sudo to override Apple’s protection measures. Using
sudo could critically impact your system security, as it allows for arbitrary code execution. Therefore I strongly advise against using sudo. There is a safer and easier way, which I’ll explain in the next section.
Install frum and openSSL
frum is a version manager for Ruby. You can install and maintain several Ruby versions and switch between them as you need. Most importantly, you can do so without interfering with the system’s preinstalled Ruby. To install frum, open a Terminal window and enter:
brew install frum
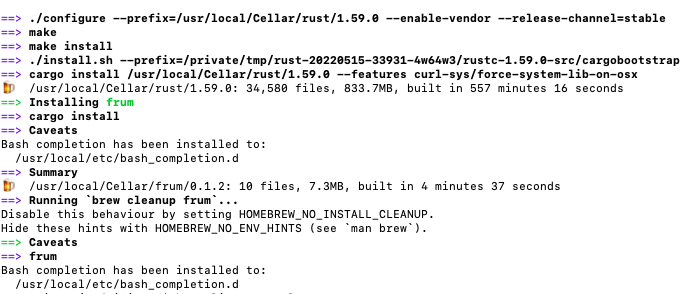
Be prepared for the installation process to take a fair amount of time (557 minutes on my 2013 MacBook, as seen in the following screenshot). The “make install” process will also likely cause high CPU load.
Homebrew’s famous beer mug icon indicates successful installation:
Next, check if you have openSSL installed. OpenSSL is required by many Ruby gems, but it’s not included when you install Ruby. Check if openSSL is present on your system by entering the following in Terminal:
brew list openSSL
If the command returns the following output, openSSL is not present on your system:
User-MacBook: Username$ Error: No such keg: /usr/local/Cellar/openssl
Install openSSL with the following command: brew install openSSL
This might again take some time and cause high CPU load as well.
Once the installation finished, you can verify proper installation of both frum and openSSL by entering in Terminal: brew list frum and brew list openssl
Output of the list command for openSSL should look something like this:
User-MacBook-:~ Username$ brew list openssl
/usr/local/Cellar/openssl@3/3.0.3/bin/c_rehash
/usr/local/Cellar/openssl@3/3.0.3/bin/openssl
/usr/local/Cellar/openssl@3/3.0.3/include/openssl/ (135 files)
/usr/local/Cellar/openssl@3/3.0.3/lib/libcrypto.3.dylib
/usr/local/Cellar/openssl@3/3.0.3/lib/libssl.3.dylib
/usr/local/Cellar/openssl@3/3.0.3/lib/engines-3/ (3 files)
/usr/local/Cellar/openssl@3/3.0.3/lib/ossl-modules/legacy.dylib
/usr/local/Cellar/openssl@3/3.0.3/lib/pkgconfig/ (3 files)
/usr/local/Cellar/openssl@3/3.0.3/lib/ (4 other files)
/usr/local/Cellar/openssl@3/3.0.3/share/doc/ (787 files)
/usr/local/Cellar/openssl@3/3.0.3/share/man/ (5490 files)
Next step is making frum available from the Terminal.
Configure your $PATH
Configuring the $PATH variables is important. When you invoke applications via the command line, the variables stored in the $PATH tell your machine where to look for the application. Specifically for this case, you want to make sure that your newly installed Ruby version is preferred over the system Ruby.
In your terminal, enter nano ~/.bash_profile
Note: You can replace nano with a text editor of your choice, for example vim.
Add the following line to your bash_profile:
eval "$(frum init)"
Restart the Terminal for changes to take effect. Enter the command exit, then close the Terminal window and start a new Terminal. Verify if everything is set correctly by entering in Terminal frum -h
Output should look like this:
User-MacBook:~ Username$ frum -h
frum 0.1.2
A little bit fast and modern Ruby version manager written in Rust

USAGE:
    frum [OPTIONS] [SUBCOMMAND]

FLAGS:
    -h, --help       Prints help information
    -V, --version    Prints version information

OPTIONS:
        --frum-dir <base-dir>                      The root directory of frum installations [default: $HOME/.frum]
        --log-level <log-level>
            The log level of frum commands [default: info] [possible values: quiet, info, error]

        --ruby-build-mirror <ruby-build-mirror>    [default: https://cache.ruby-lang.org/pub/ruby]

SUBCOMMANDS:
    completions    Print shell completions to stdout
    global         Sets the global Ruby version
    help           Prints this message or the help of the given subcommand(s)
    init           Sets environment variables for initializing frum
    install        Installs a specific Ruby version
    local          Sets the current Ruby version
    uninstall      Uninstall a specific Ruby version
    versions       Lists installed Ruby versions
Install Ruby via frum
You are now ready to install Ruby. To see a list of available versions, enter in Terminal: frum install -l. Output should look like the following snippet:
User-MacBook:~ Username$ frum install -l
3.0.0-preview1
3.0.0-preview2
3.0.0-rc1
3.0.0
3.0.1
3.0.2
3.0.3
3.0.4
3.1.0-preview1
3.1.0
3.1.1
3.1.2
If you require a specific version, scroll through the list to see if the desired version is available. To install the latest version, choose the last entry in the list. This would be version 3.1.2 in the above snippet. Your output might vary from the example. Make sure that you enter the desired version exactly as it appears in your output list.
To install e.g. version 3.1.2, enter in Terminal frum install 3.1.2. To install another version, replace 3.1.2 with your desired version number.
Output should look like this:
User-MacBook:~ Username$ frum install 3.1.0
==> Downloading https://cache.ruby-lang.org/pub/ruby/3.1/ruby-3.1.0.tar.xz
==> Extracting ruby-3.1.0.tar.xz
==> Building Ruby 3.1.0
After successful installation, restart your Terminal by entering the exit command, and start a new Terminal window.
Verify correct installation
Now verify correct installation by entering in Terminal ruby -v. Output should look like this:
User-MacBook:~ Username$ ruby -v
ruby 3.1.0p0 (2021-12-25 revision fb4df44d16) [x86_64-darwin18]
Optionally, you can check your new Ruby’s installation path by entering in Terminal which ruby
Output should look like this:
User-MacBook:~ Username$ which ruby
/var/folders/d5/drzt3yms779flsl7mw5zz9d80000gn/T/frum_45158_1652779210236/bin/ruby
You can now use your Ruby installation without risking to compromise your machine.
Personal notes
I first attempted to install Ruby via Homebrew. That turned out to be both a bad idea and a chance to learn something. I had a working Ruby installation, $PATH variables properly set for both Ruby and gems, and gems properly installed. However, executing jekyll -v would return command not found. I spent several days with trying to fix the problem, but to no avail. I eventually gave up and installed frum. Frum worked like a charm, which is why I recommend to prefer it over Homebrew anytime. Don’t spend more time on troubleshooting required software for a certain task, than with the actual task itself.